8 Essential RV Modifications for Cats — Comfort, Safety & Small‑Space Solutions
Last Updated on September 8, 2025
RV life with cats becomes simpler when space works smarter. The 8 essential RV modifications for cats deliver comfort, safety, and small‑space solutions that stand up to travel. Expect compact, low‑odor litter setups, layered escape‑prevention, and secure vertical territory that fits tight floor plans.
Readers will find DIY and store‑bought options with cost ranges, plus anchoring methods for thin RV walls. Sections cover catios, space‑saving scratchers, built‑in crates and ramps, cleanable hygiene stations, and temperature‑aware pet cameras. Travel‑day checklists and rental‑friendly, removable mods round out a setup that keeps cats settled and owners confident.
Litter solutions that save space and cut odor
Small RVs demand compact, low-odor litter systems that keep cats comfortable and owners sane. The right choice balances containment, ventilation, and easy maintenance without sacrificing floor space. Below are practical options and field-tested tips for on-the-road litter management. Traveling with cats in an RV
Types (hidden drawer, under-stairs, enclosed units)
Hidden-drawer boxes slide into cabinets and free floor space. They usually feature a pull-out tray for scooping. Under-stairs or cabinet-cutout units use dead space and keep the box out of sight. Enclosed freestanding units give cats privacy and trap tracking litter. Choose a low-entry model for older cats and one with a replaceable filter if odor is a concern.
Placement, ventilation and odor-control tips
Place boxes in low-traffic, well-ventilated spots away from cooking areas and direct heat. Add a carbon filter or small fan to an enclosed unit to reduce smells. Avoid sealed cupboards without airflow; stale air concentrates odor. Position boxes on a non-slip mat to protect cabinetry and catch stray litter.
DIY builds vs compact store-bought options and cost estimates
DIY hidden drawers cost $50–$150 in materials. They allow custom fits for odd spaces. Compact store-bought units range $30–$200 and save time. Enclosed plastic boxes sit near $30, while high-end vented drawer systems approach $200. Factor in filters, liners, and tools when budgeting.
Cleaning schedule and litter management on the road
Scoop daily or twice daily on multi-cat trips. Replace litter weekly for clumping types; silica may last longer but still needs monitoring. Store fresh litter in sealed bins to prevent moisture. Use disposable liners or washable trays for quick swaps at campsites. Carry a small odor-neutralizing spray or baking soda, but test for cat sensitivity first. Test any setup on a short trip before committing to long routes.
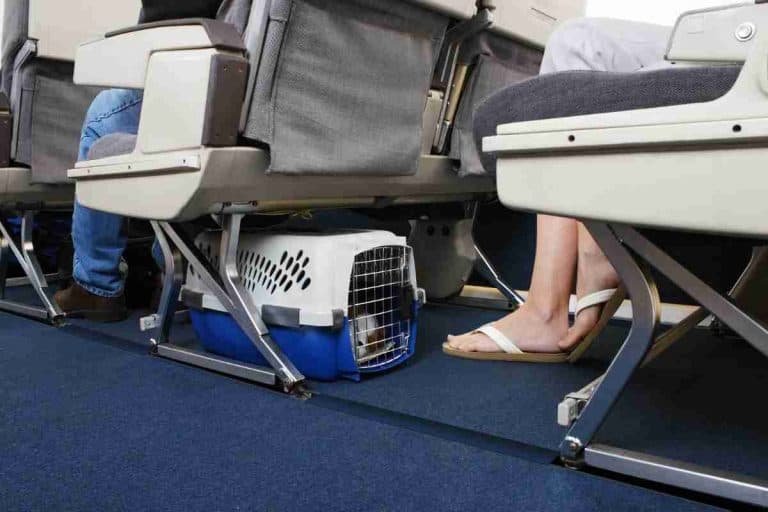
Secure exits and escape-prevention measures
Cats find tiny gaps and sudden openings irresistible. Prioritize layered barriers that stop escapes before they start. Start by auditing every potential exit: main doors, patio doors, slide-outs and roof vents. Install a secondary barrier inside the primary door, such as a short vestibule or baby-gate adapted for the RV’s width. Add visual cues at thresholds—colored tape or rugs—to discourage impulsive dashes.
Use hardware-grade door sweeps and weatherstripping to close gaps under doors. Reinforce hinges and add magnetic or spring-loaded catches that hold doors securely during travel and when parked. For campsite nights, consider a removable screen vestibule that gives airflow while keeping cats inside.
Combine physical improvements with routines. Keep exterior doors closed until all humans and cats are accounted for. Store carriers by the door only when ready to use. For more practical escape-prevention tips specific to RVs, see how to keep cats from escaping an RV.
Reinforced screen doors, slide-out blockers and cat-proof latches
Standard RV screens and latches often fail with a determined cat. Upgrade to pet-proof screen doors with metal frames and hardware cloth reinforced into the mesh. Reinforce frames at the corners to prevent twisting and add a lockable crossbar to stop strong pushes.
Slide-outs can create pinch points and escape routes. Install slide-out blockers that lock the slide into place while parked. Use rubber bumper guards over exposed edges to prevent claws finding purchase. Replace simple push-button latches with keyed or car-style latches that resist deliberate fiddling.
For cabinets and smaller access panels, add childproof magnetic locks or screw-on hasps. Place a small foam bumper on latches to muffle clicks and reduce curiosity. These upgrades protect both the cat and the RV’s mechanisms without major structural changes.
Covering switches, vents and other escape risk points
Switches, roof vents and under-seat gaps offer unexpected escape paths. Cover wall-mounted switches with clear plastic guards that allow use but block paw access. Label critical controls so guests don’t fumble them and accidentally open a hatch.
Vents and intake grilles require mesh screens with fine openings to stop paws and tails. Use removable vent covers that lock in place during stops. Under-bunk or appliance gaps need filler panels or foam inserts to prevent cats from crawling into cavities where they can become trapped or access exterior panels.
Pay attention to moving parts like awning motors and leveling jacks. Install guard plates and tether loose cords. Regularly test covers and replacements during a dry run to ensure they stay secure under vibration and during door use. For broader RV cat-safety adjustments, consult practical travel advice at traveling with cats in an RV.
Travel-day checklists and training to reduce bolting risks
Preparation cuts bolting risk more than last-minute fixes. Create a short travel-day checklist and post it by the door. Include steps such as securing carriers, closing vents, stowing treats and confirming tagged collars. Run the checklist aloud before any exterior door opens.
Train cats with gradual desensitization. Practice short exits while keeping the cat in a carrier or on a leash in a secure area. Reward calm behavior with treats and quiet praise. Teach a reliable recall using a unique cue word and high-value rewards.
Make carriers comfortable and predictable: place them in the RV with familiar bedding days before travel. For cats that resist carriers, use brief, frequent sessions to build tolerance. Carry a simple checklist card for guests to follow, and encourage everyone to pause and verify the list before stepping out. For hands-on techniques to calm anxious cats in transit, review how to travel with a fussy feline.
Vertical territory — perches, window beds and wall-mounted trees
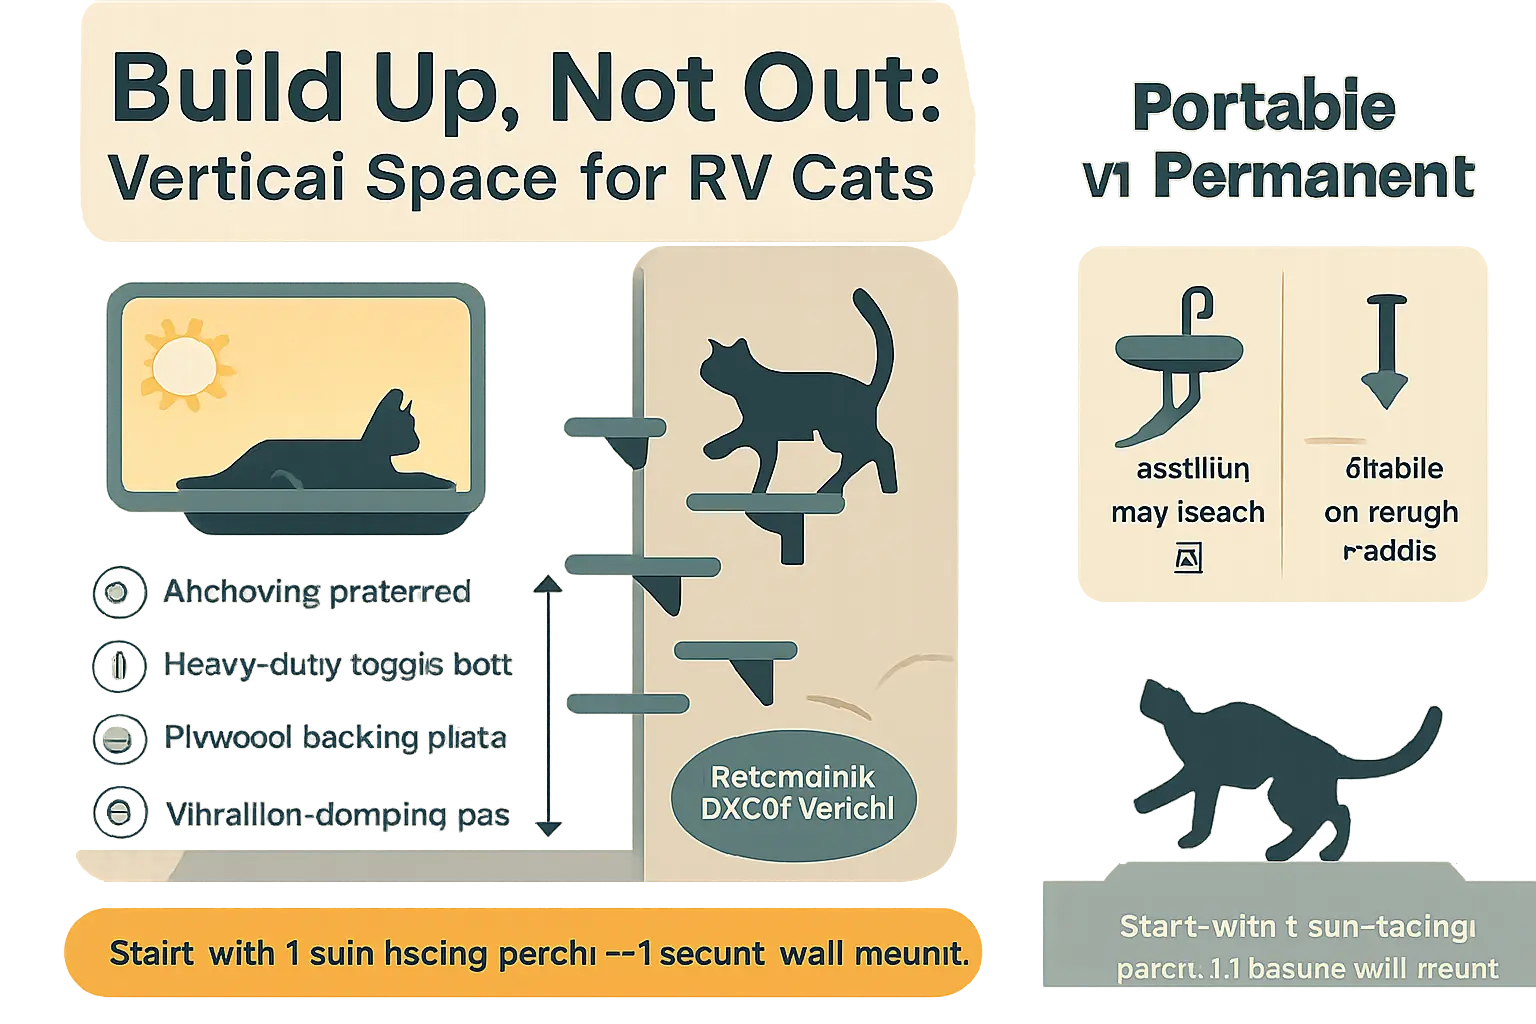
Cats need vertical space to feel secure, especially in the compact footprint of an RV. Adding perches, window beds and wall-mounted trees gives each cat a dedicated vantage point and reduces stress during travel. Choose locations that stay calm during driving and offer views while parked.
For practical guidance on planning space and behavior, consult resources about traveling with cats in an RV.
Choosing sun-facing window perches and compact wall trees
Select perches sized to the cat’s body, not just weight. A perch platform 16–18 inches deep fits most adult cats. Pick fabrics that resist hair and dry quickly. Sun-facing window beds encourage napping and help regulate body temperature. Ensure the bed’s height gives a clear outdoor view without exposing the cat to drafts.
Compact wall trees stack small platforms vertically rather than occupying floor space. Incorporate scratching surfaces on lower tiers to concentrate activity and protect upholstery.
Installation, weight limits and anchoring for RV walls
RV walls are thin and usually backed by studs only in some spots. Anchor mounts into studs whenever possible. If studs are unavailable, use heavy-duty toggle bolts, molly anchors, or install a small plywood backing plate behind the wall panel to spread load. Design mounts to handle at least three times the cat’s weight to account for jumping forces.
Test each mount with weight before allowing a cat on it. Use vibration-damping pads where mounts meet the wall to reduce noise while driving.
Portable perches vs permanent mounts: pros and cons
Portable perches attach with suction cups, straps or freestanding frames. They suit renters and short trips and avoid wall modifications. However, suction models lose hold on curved or textured surfaces and can detach under stress.
Permanent mounts require installation but provide superior stability on rough roads. They minimize movement and injury risk during sudden stops. For owners who travel frequently, bolting a few well-placed perches and a compact wall tree delivers the best balance of safety and comfort.
CTA: Prioritize one sun-facing perch and a secure wall mount before long trips to see immediate benefits in cat comfort and calm.
Space-saving scratching and enrichment solutions
Cats in RVs need vertical and multi-use options that fit tight floor plans. Choose scratching surfaces and enrichment items that attach to walls, tuck under bunks, or convert to dual-use furniture. Prioritize lightweight, secure mounts and easily replaceable materials like sisal and corrugated cardboard.
Compact scratch posts, sleeves and multi-use furniture ideas
Wall-mounted sisal pads and narrow vertical posts save floor space and satisfy clawing instincts. Use scratch sleeves on poles or removable ramp edges to protect upholstery. Convert a shallow storage bench into a scratch-and-rest station by lining its top with a replaceable scratch mat and adding a cushion inside. Foldable cardboard scratchers store under seats. Advantages: less clutter, easy replacement, and dual functionality as steps or perches.
DIY wrap and mounting techniques for small RV spaces
Secure scratch elements with 3M Command hooks rated for the load, small L-brackets, or toggle anchors into cabinetry framing. Wrap posts tightly with sisal rope, glue with non-toxic adhesive, and staple from the inside to hide fasteners. Anchor tall pieces at two points to prevent tipping during travel. Cover any exposed staples and test mounts before each trip.
Interactive toys and rotation strategies to prevent boredom
Offer puzzle feeders, compact feather wands, and suction-cup teaser toys that clip to windows or cabinet doors. Rotate sets weekly and hide treats in folded boxes to stimulate hunting behaviors. Short play sessions before departure reduce travel stress. For additional setup and travel-specific tips, see traveling with cats in an RV.
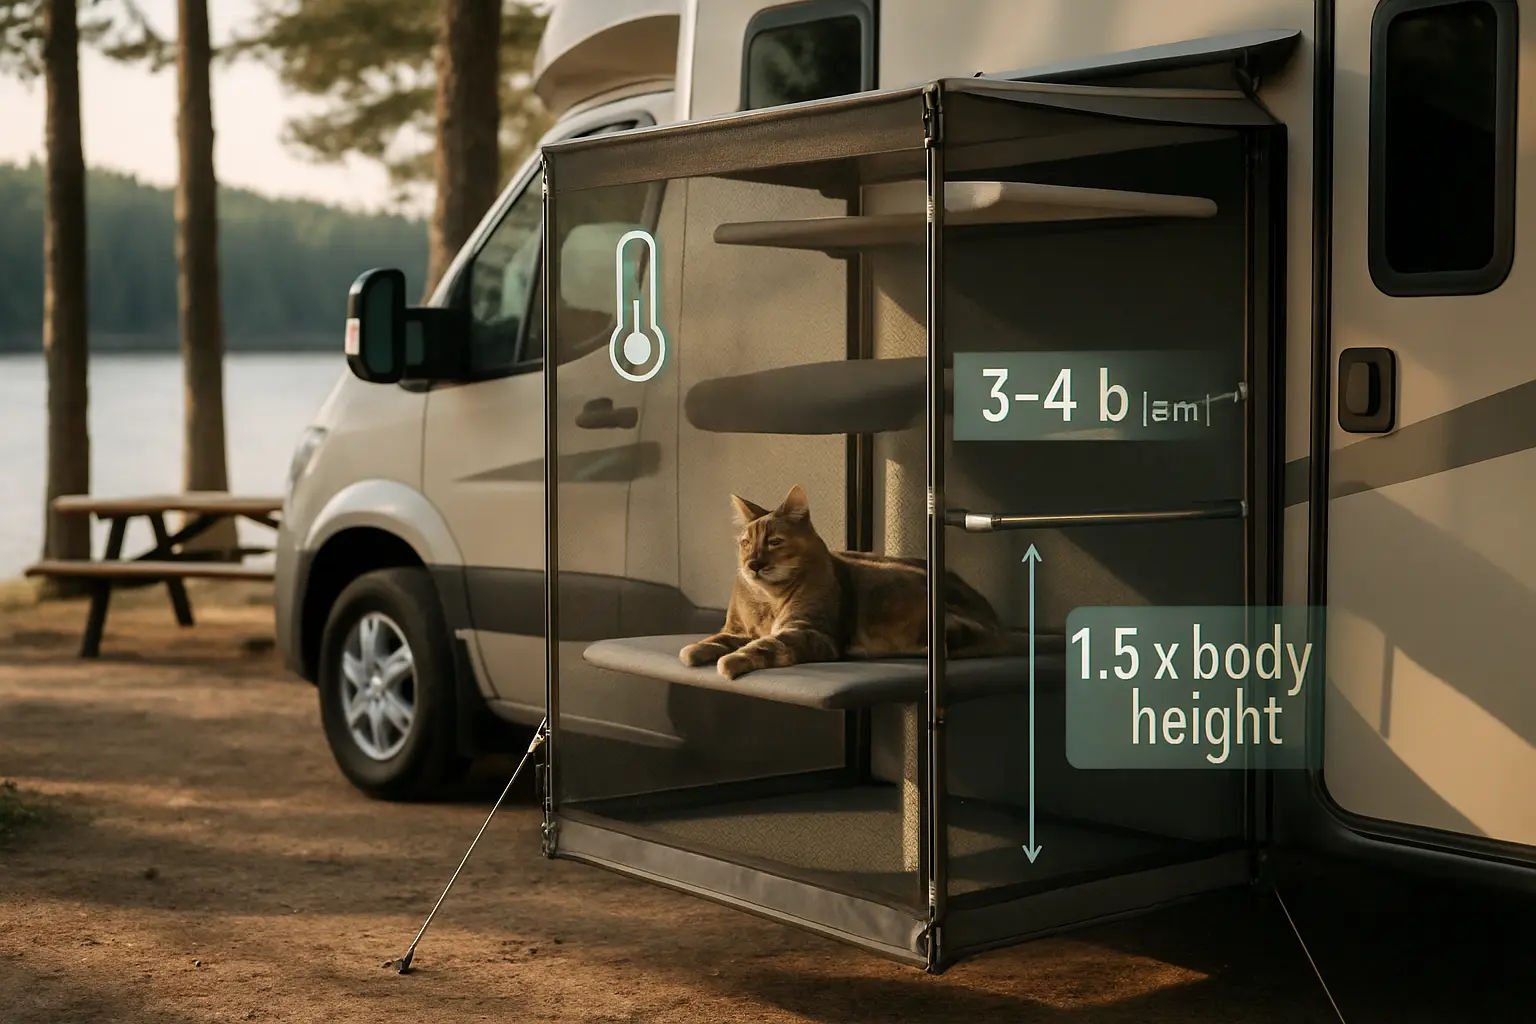
Onboard catio and screened outdoor modules
An onboard catio or a screened outdoor module gives a traveling cat safe outdoor access without leaving the RV. Owners should choose breathable, chew-resistant mesh and weatherproof frames. Modular units that attach to an RV window, slide-out, or awning allow fresh air and sunlight while stopping escapes. Place the unit where temperature and airflow remain comfortable, away from direct afternoon sun when possible. Include raised platforms and scratching posts to satisfy climbing instincts and reduce stress. Designate a small, ventilated litter area inside the RV rather than inside the catio to minimize odors and keep sand out of bedding. Regularly inspect seams, zippers, and fasteners for wear, and rotate enrichment toys to prevent boredom. For practical tips on long trips and layout ideas, see traveling with cats in an RV.
Pop-up, attachable and tent-style catios: when to use each
Pop-up catios suit quick stops and low-footprint needs. They deploy in seconds and fold compactly for storage. Choose one with reinforced poles and small-mesh fabric to prevent paw slippage. Attachable catios bolt or clip to an RV door or window; they work best for longer stays and provide a more permanent barrier. Look for models with multiple access points and replaceable panels. Tent-style catios perform well on uneven ground and at beaches. Pick sand-resistant flooring and sealed seams. Match the catio type to trip length, campsite terrain, and a cat’s temperament. Nervous cats benefit from attachable units that limit sudden exposures. Adventurous cats enjoy tent-style units that allow low-level exploration. For escape-proofing strategies complementary to catio choice, see how to keep cats from escaping RV.
Anchoring, sizing and campsite setup best practices
Anchor the module to the RV chassis or awning rails to prevent uplift in gusts. Use rated straps, cam buckles, and ground stakes designed for soft soil. Size the catio so a cat can run three or four body lengths and climb vertically at least 1.5 times its height. Place platforms at varied heights and include a shaded retreat. Position the catio away from fire rings, grills, and busy pathways to reduce stress and noise. Add a non-slip mat and secured litter tray weighted to resist tipping. Test zippers and quick-release buckles before each outing. On windy sites, attach guy lines and lower the catio profile. Keep emergency tools—a folding carrier and tether—nearby. For vehicle-securement techniques that inspire anchoring choices, consult how to secure a cat carrier in car.
Safety checks, supervision and campground rules to consider
Before each use, do a full safety check: inspect mesh for holes, test fasteners, and ensure no sharp edges protrude. Supervise cats until they reliably use the space. Maintain a leash and harness for brief supervised outings outside the module. Confirm campground rules on pets, outdoor enclosures, and leash requirements to avoid fines or removal. Watch for wildlife activity; raccoons and birds of prey can threaten unsupervised cats. Monitor weather alerts and bring the cat inside at the first sign of storms. Use up-to-date parasite prevention, and clean the catio between uses to reduce disease risk. Carry a first-aid kit, copies of vaccination records, and a plan for emergency evacuation to the nearest vet. For calming and behavior tips that help with supervision, see how to travel with a fussy feline.
Built-in rest spots, crates and mobility aids
Built-in rest spots, crates and mobility aids must fit the RV’s layout and the cat’s routines. Owners should map traffic flow and mark permanent anchor points before any carpentry. Place rest areas where cats can observe the road but remain out of direct drafts. Use marine-grade plywood, high-density foam and waterproof upholstery for long life and easy cleaning. Include ventilation holes and low-light options for anxious felines. Fasten all built-ins to floor joists or cabinet frames with marine hardware and include quick-release latches for emergency removal.
Design with modularity: make cushions removable, crate inserts detachable and ramps foldable. Keep weight limits visible on each element and use non-toxic finishes. Sound-dampening foam behind resting panels reduces road noise and helps cats settle. For examples on arranging an RV to suit feline needs, see traveling with cats in an RV. Test each solution on short trips before final installation.
Designing a cozy den under beds or benches
Designing a cozy den under beds or benches creates a secure retreat that uses dead space. Make the opening at least as wide as the cat’s shoulders and 1.5 times as tall as the animal when sitting. A recessed cubby 12–18 inches high works for most adult cats. Line the floor with a washable, low-profile cushion and add a thin thermal mat for colder nights.
Ventilation matters: drill small vents near the rear and install a passive mesh for airflow. For odor control, use a removable tray beneath the cushion to catch litter or hair. Add a low-intensity LED strip on a motion sensor for nighttime access without startling the cat. Include a scratch strip mounted near the den entrance to discourage door-scratching and preserve upholstery.
Secure the den door with a simple latch that prevents it from swinging on rough roads, but that opens easily from outside. For tips on keeping cats safely contained while giving them calm spaces, consult how to keep cats from escaping an RV.
Integrating built-in crates for calm travel and alone time
Integrating built-in crates balances secure travel with comfortable alone time. Choose a crate length at least one and a half times the cat’s body length so the cat can turn and stretch. Bolt the crate frame to the RV floor or a bench frame, and include a secondary anchor point to prevent rotation during sudden stops. Use a front-panel door with dual latches to prevent accidental openings.
Line the interior with a washable pad and a non-slip base. Add passive ventilation panels to keep air moving while parked. For travel, include tie-down points to accept a harness or restraint strap. Sound insulation around the crate reduces engine and road noise, which calms many cats. Keep a calming pheromone spray or plug-in nearby but avoid strong scents inside.
Make the crate accessible from both a living-space door and a roadside service hatch. This makes cleaning and rescue faster. For practical guidance on securing carriers and crates in vehicles, see how to secure a cat carrier in car. Owners should trial the crate on short drives before relying on it for long trips.
Ramps and steps for older or mobility-challenged cats
Ramps and steps reduce strain for aging or mobility-challenged cats. Keep ramp inclines gentle—ideally under 20 degrees—and provide a non-slip surface such as rubberized traction or indoor/outdoor carpet. Make ramps at least 10–12 inches wide for confident footing. For multi-level access, use modular steps with uniform rise heights to prevent missteps.
Choose lightweight but sturdy materials. Aluminum frames with marine plywood treads strike a good balance between weight and strength. Add edge rails or low curbs to help cats feel secure. Secure ramps to the RV floor or bench with quick-release pins for removal when not needed.
Position ramps so cats can reach litter boxes and sleeping spots without jumping. Gradually acclimate cats by placing treats and familiar bedding on the steps. Consult a veterinarian for severe mobility issues and to check weight-bearing limits. For behavioral tips that support acclimation during vehicle travel, review how to calm a cat in the car.
Cleanable, durable surfaces and hygiene stations
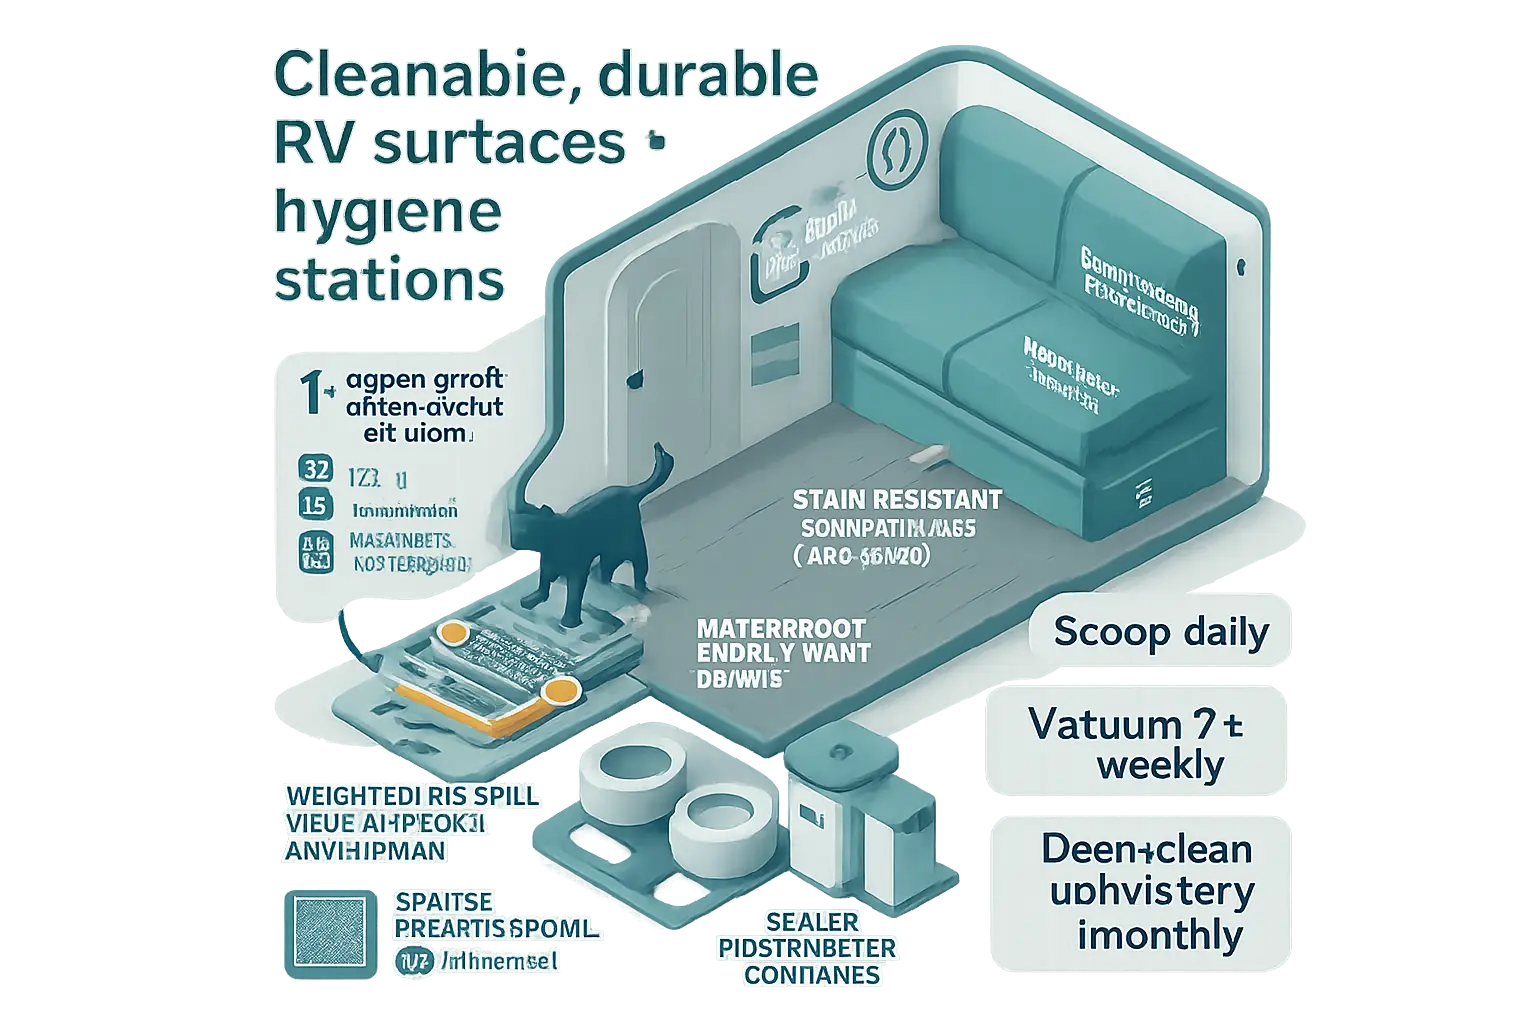
The primary priority for cat-friendly RV interiors is hard-wearing, easy-to-clean surfaces. Choose plank vinyl or waterproof laminate flooring with welded seams to keep urine and spilled water from seeping into subfloors. Use marine-grade or Crypton-treated upholstery for benches and cushions to repel stains and resist odor buildup. Add removable, machine-washable covers on high-use seating so hair and dander lift out in a wash.
Install a low-profile paw-cleaning station at the main entry. A shallow tray with absorbent, washable pads and a soft rubber mat removes litter and dirt before cats roam the coach. Pair that with a compact handheld sprayer or pet-safe wipes stored nearby for quick spot-cleaning after muddy outings.
For more practical travel-oriented setup ideas, consult the tips for traveling with cats in an RV guide.
Flooring and upholstery materials that resist stains and fur
Opt for nonporous floors and upholstery with tight weaves. Luxury vinyl plank limits scratches and can be swept or mopped fast. Upholstery fabrics with stain barriers shed fur and wipe clean. Add textured, non-slip stair treads and corner guards to protect edges and reduce wear in high-traffic zones.
Paw-cleaning stations, washable rugs and no-spill feeding solutions
Place a low-entry tray at doors with a layered scheme: a rubber grate, an absorbent washable rug, then a replaceable pad. Use ceramic or weighted no-spill bowls and anti-tip feeders to avoid puddles. Keep a small, ventilated bin for soiled pads and a sealed container for litter disposal.
Ventilation, odor control and routine maintenance tips
Prioritize cross-ventilation and an exhaust fan near the litter area. A compact HEPA air purifier and activated-charcoal sachets cut odors. Maintain a routine: scoop daily, vacuum with a pet brush attachment twice weekly, and deep-clean upholstery monthly with enzyme cleaners. Replace furnace and purifier filters per manufacturer intervals to maintain air quality.
Monitoring, health gear and rental-friendly choices
Monitoring systems and compact health gear give cats security and owners peace of mind. Choose solutions that fit limited RV power and space. For practical tips on daily travel routines, see traveling with cats in an RV.
Temperature sensors, pet cameras and remote monitoring options
Install a dedicated temperature sensor in the cat’s primary area. Set alerts for heat and cold thresholds. Use a small pet camera with motion alerts and two-way audio to check behavior and intervene remotely. Pick models that record locally or to the cloud and that run on 12V or battery backup. Mount cameras high or tucked near litter and beds to avoid knocks. Prioritize devices with low bandwidth modes for campgrounds with weak internet.
Travel first-aid kit, vaccination/vet checklist and emergency plan
Assemble a compact kit in a waterproof case. Include:
- Basic bandages, antiseptic wipes, styptic powder and tweezers
- Saline for eye/wing rinses and an oral syringe
- Spare harness, leash and a familiar blanket or towel
- Printed and digital copies of vaccination records, microchip number and local vet contacts
Review vaccinations before long trips and update flea/tick prevention seasonally. CTA: Save vet contacts and emergency instructions to the phone and a laminated card in the kit.
Permanent vs removable mods for owners who rent out their rig
When renting the rig, choose reversible fixes: non-drill anchor straps, suction-window screens, clip-on carriers and adhesive-backed carpet protectors. Use Velcro or Command-style hooks for tether points and removable litter trays that lock in place without screws. Document the interior condition with photos before and after modifications. Removable tech, like plug-in cameras and battery sensors, preserves the RV’s condition and avoids deposit disputes while keeping cats safe and comfortable.
Summary
This guide outlines eight focused RV modifications that keep cats safe, comfortable, and clean on the road. It covers compact litter systems, layered escape-prevention, vertical territory, space-saving scratching solutions, outdoor catios, built-in rest areas and crates, easy-clean surfaces, and smart monitoring and health gear.
Each section delivers practical, small-space strategies that fit real RV layouts—prioritizing ventilation, stable anchoring, reversible installs, and routine checklists. By planning placements, using pet-safe materials, and testing builds on short trips, owners can reduce stress, control odor, and create a secure, enriched environment for travel.
Key Takeaways
- Choose compact litter solutions (hidden drawers, under-stair cutouts, low-entry enclosed units) with ventilation, carbon filters, and non-slip mats; scoop daily and store fresh litter in sealed bins.
- Layer escape-prevention with a door vestibule or baby gate, reinforced screens and sweeps, cat-proof latches, and a posted travel-day checklist plus recall training.
- Build vertical territory using sun-facing window perches and compact wall trees anchored to studs or backed with plates; rate mounts for at least 3× cat weight.
- Use space-saving enrichment such as wall-mounted sisal pads, scratch sleeves, and foldable cardboard units secured with Command hooks, L-brackets, or toggles.
- Add a secure catio sized for running and climbing, anchored to the chassis or awning rails, with shade, varied perches, and hands-on supervision.
- Prioritize cleanable surfaces and monitoring: waterproof flooring, stain-resistant upholstery, paw-clean stations, HEPA and charcoal odor control, temp sensors, pet cams, and a compact first-aid kit.
FAQ
- What litter box setup works best in a small RV? Hidden drawers or under-stair cutouts save floor space, while low-entry enclosed units manage scatter and odor. Place boxes in ventilated, low-traffic spots away from heat, and add a carbon filter or small fan.
- How can owners prevent cats from bolting through RV doors? Combine a secondary barrier (vestibule or baby gate), reinforced screens, door sweeps, and reliable latches with a posted checklist and recall training before any exterior door opens.
- What’s the safest way to mount perches and wall trees to RV walls? Anchor into studs when possible; otherwise use heavy-duty toggles or a plywood backing plate. Rate each mount for 3× the cat’s weight and test under load before use.
- How should a catio be anchored and sized at campsites? Strap to the RV chassis or awning rails and stake with rated ground hardware; add guy lines in wind. Size for three to four body lengths of running space and 1.5× body height for climbing, with shaded retreats.
- Why choose removable mods when renting out the rig? Non-drill straps, suction screens, Velcro mounts, and clip-on trays protect finishes and deposits while keeping cats safe. Document conditions with photos before and after each install.