5 Safe Ways to Secure a Dog in an SUV Cargo Area
Last Updated on September 10, 2025
Many drivers ask how to secure a dog in an SUV cargo area safely. Proper restraint reduces crash injuries, limits driver distraction, and protects passengers. Using a crash-tested crate, a vehicle-rated harness and tether, or a rigid cargo barrier delivers real control. Correctly chosen anchor points, D-rings, and tie-down straps keep everything stable.
This guide presents 5 safe ways with clear, step-by-step setup. It covers sizing, anchor checks, strap routing, and non-slip stabilization. Readers also get quick tests for tether length, ventilation, and legal readiness. Every trip can start calm, secure, and compliant.
Why securing a dog in an SUV cargo area matters
Securing a dog in an SUV cargo area reduces injury risk, prevents driver distraction, and protects other vehicle occupants. A sudden stop or collision can turn an unrestrained dog into a heavy projectile. That impact can injure the dog and harm people in the cabin. Proper restraint also prevents the dog from jumping into the passenger area and interfering with the driver.
Choosing the right restraint and placement matters for crash performance, ease of evacuation, and the dog’s comfort. Owners should favor tested equipment and stable anchor points over improvised solutions. For recommendations on crash-tested containment options, consult resources like best dog crates for car travel, which reviews sturdy crates designed for vehicle use.
Crash and injury risks for unrestrained pets
Unrestrained dogs suffer blunt-force trauma, spinal injuries, and internal damage in high-speed stops. Even at moderate speeds, a dog thrown against cargo walls can break bones. Airbags and restraint systems designed for humans offer no protection to pets. Using a crash-rated crate or a vehicle-specific harness minimizes motion and spreads forces over stronger body areas.
Legal, insurance, and public-safety considerations
Laws about loose pets in vehicles vary by state and country. Some jurisdictions cite driver distraction or negligent driving if a pet interferes with operation. An insurer may reduce or deny claims if negligence contributed to an accident. Owners should check local statutes and insurer recommendations. For discussion of where pets may safely ride and legal nuances, see are dogs allowed to travel in the footwell of a car.
When the cargo area is a suitable location for your dog
The cargo area suits dogs that tolerate confinement, have appropriate size, and can remain calm. Evaluate ventilation, temperature, and access to water before each trip. Use a non-slip mat, secure a crate to anchor points, and test restraint attachment points for movement. Smaller, anxious dogs may prefer a crate with familiar bedding. For broader travel-preparation advice and gear lists, consult essential dog travel tips and gear for road trips. Owners should perform short trial drives to confirm the dog stays settled before longer trips.
What to prepare before you secure the dog
Owners should gather measurements, hardware, and comfort items before fitting a dog in an SUV cargo area. Early preparation reduces last-minute risks and improves comfort for long drives.
Measure the cargo space and choose the right-sized crate or harness
Measure cargo length, width, and height with rear seats up and down. Allow enough room for the dog to stand, turn, and lie down comfortably. Add about 10% extra space for large-breed movement. Choose a crate or harness rated for vehicle travel and sized to those measurements. For crates, consider crash-tested, metal-frame models for large dogs and sturdy soft-sided or plastic crates for smaller breeds. For harness solutions, pick a harness designed for crash restraint and pair it with a rated tether. For a guide to crate options and reviews, see this best dog crates for car travel.
List of tools and anchor types to have on hand
Owners should pack a compact toolkit and reliable anchor hardware. Recommended items include:
- Crate tie-down straps or ratchet straps rated for vehicle loads
- Seatbelt extenders or harness-to-seatbelt adapters
- Locking carabiners and anchor plates
- Non-slip cargo mat to prevent sliding
- Quick-release buckles for fast adjustments
- Soft padding, travel water bowl, and a leash
Verify strap weight ratings and buy hardware designed for automotive use.
Basic vehicle checks (anchor points, hatch operation, ventilation)
Owners should inspect factory anchor points and the cargo floor before travel. Tug each anchor to confirm it holds solidly. Test the hatch or liftgate to ensure it closes without pinching crate handles or straps. Check ventilation paths in the cargo area; avoid blocking vents and confirm good airflow with windows or climate controls. Remove loose items that can shift and injure the dog during sudden stops. Finally, run a short test drive with the dog secured to confirm tether length, visibility, and overall comfort. Pack the prepared kit within easy reach before departure as a simple CTA to ensure safety on every trip.
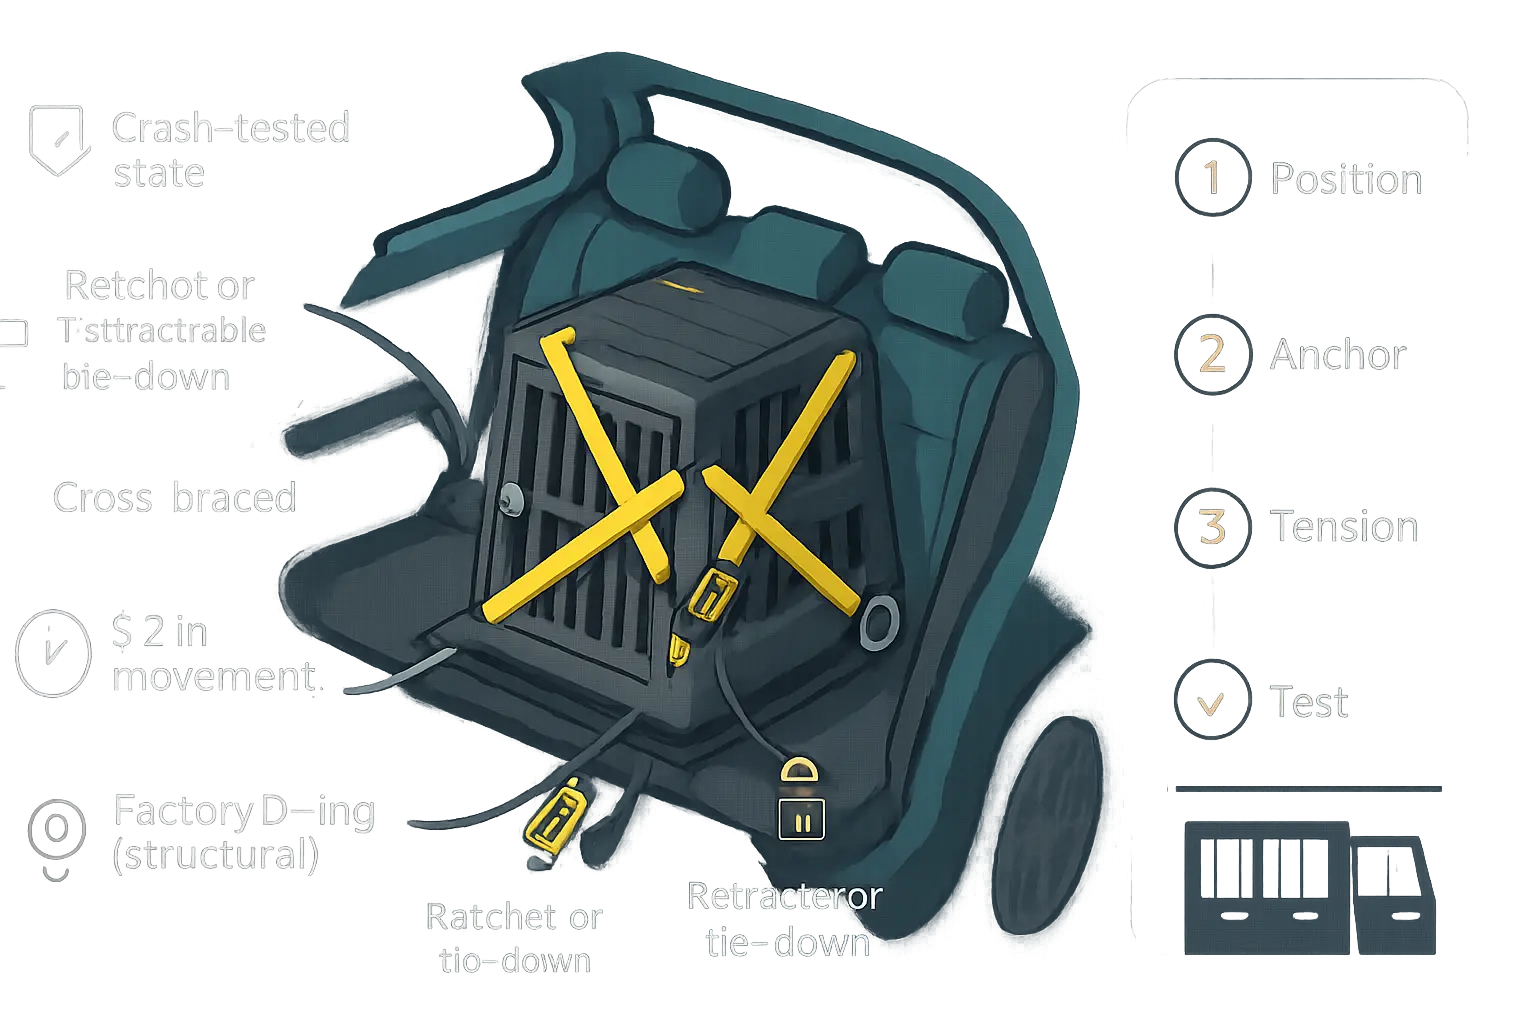
Method 1 — Fasten a travel crate using ratchet or retractable tie-down straps
Selecting a vehicle-rated, crash-aware crate and proper sizing
Pet owners should choose a crate rated for vehicle travel and crash-tested when possible. Measure the cargo area and allow enough room for the dog to stand, turn, and lie down comfortably. Select a crate with reinforced anchor points or welded loops designed for tie-downs. For model options and safety-focused reviews, consult a dedicated guide to best dog crates for car travel. Ensure the crate’s door latches secure and ventilation stays unobstructed.
Identifying secure anchor points and compatible strap types
Locate factory anchor points in the SUV cargo area: D-rings, L-track fittings, seat-bolt loops, or dedicated cargo-tie rings. Avoid anchoring to trim panels or plastic hooks. Choose straps rated for vehicle restraint use: heavy-duty ratchet straps or high-quality retractable tie-downs. Use straps with coated hooks to prevent metal-on-metal damage. Confirm the crate’s anchor hardware matches the strap end fittings.
Step-by-step: positioning, attaching, and tensioning the straps
Position the crate centered against a solid surface, like the rear seatback. Loop straps through the crate’s welded anchor loops, then attach to vehicle anchor points. If using ratchet straps, take up slack slowly and ratchet until the crate won’t shift more than a few inches under manual force. For retractable systems, lock the mechanism per manufacturer instructions. Cross-bracing straps—one front-to-back and one side-to-side—reduces forward and lateral movement. Check all connections before driving and re-check after the first short trip.
Comfort and stability add-ons (anti-slip pads, bedding, ventilation)
Place an anti-slip pad beneath the crate to reduce sliding and pressure on the cargo floor. Add low-profile bedding that won’t interfere with airflow or crate latches. Use crate-mounted fans or ensure vehicle vents reach the cargo area for long trips. Attach a light, chew-resistant tether inside the crate to limit excessive movement without restraining the dog’s head. A quick CTA: compare crash-rated crates and compatible tie-down kits before purchase to ensure proper fit and safety.
Method 2 — Secure the dog with a cargo-specific harness and tether
Choosing a crash-tested harness and appropriate tether hardware
Choose a crash-tested harness designed for vehicle use rather than a walking harness. Look for harnesses that list FMVSS or ISO testing, solid steel hardware, and padded chest plates. Match the harness size to the dog’s chest girth and weight rating. Select a tether with welded steel carabiners or automotive-grade snap hooks. Avoid thin webbing or cheap plastic clips. For product guidance and gear combinations, consult an essential dog travel gear resource to compare trusted models.
Attaching to D-rings, factory cargo anchors, or seat-belt points
Attach the tether to a manufacturer-rated anchor point only. Use factory D-rings, rear cargo anchors, or reinforced seat-belt mounting bolts. Avoid tying to cargo-area trim, tie-down rails meant for luggage, or loose fixtures. If the vehicle lacks suitable anchors, install a certified cargo anchor plate or use a removable anchor that secures to known structural points. Secure connections prevent transfer of force to weak panels during sudden stops.
Correct tether length, routing, and preventing entanglement
Set tether length so the dog can lie down and stand but cannot launch forward. Aim for a short slack length—about half the dog’s body length—so the dog cannot reach the rear hatch. Route the tether away from sharp edges, cargo, and moving parts. Use swivel connectors to reduce twisting and clip tether to a dorsal harness attachment to limit rolling. Check the attachment each trip and replace any frayed webbing immediately. A safety check before every drive reduces risk and improves comfort.
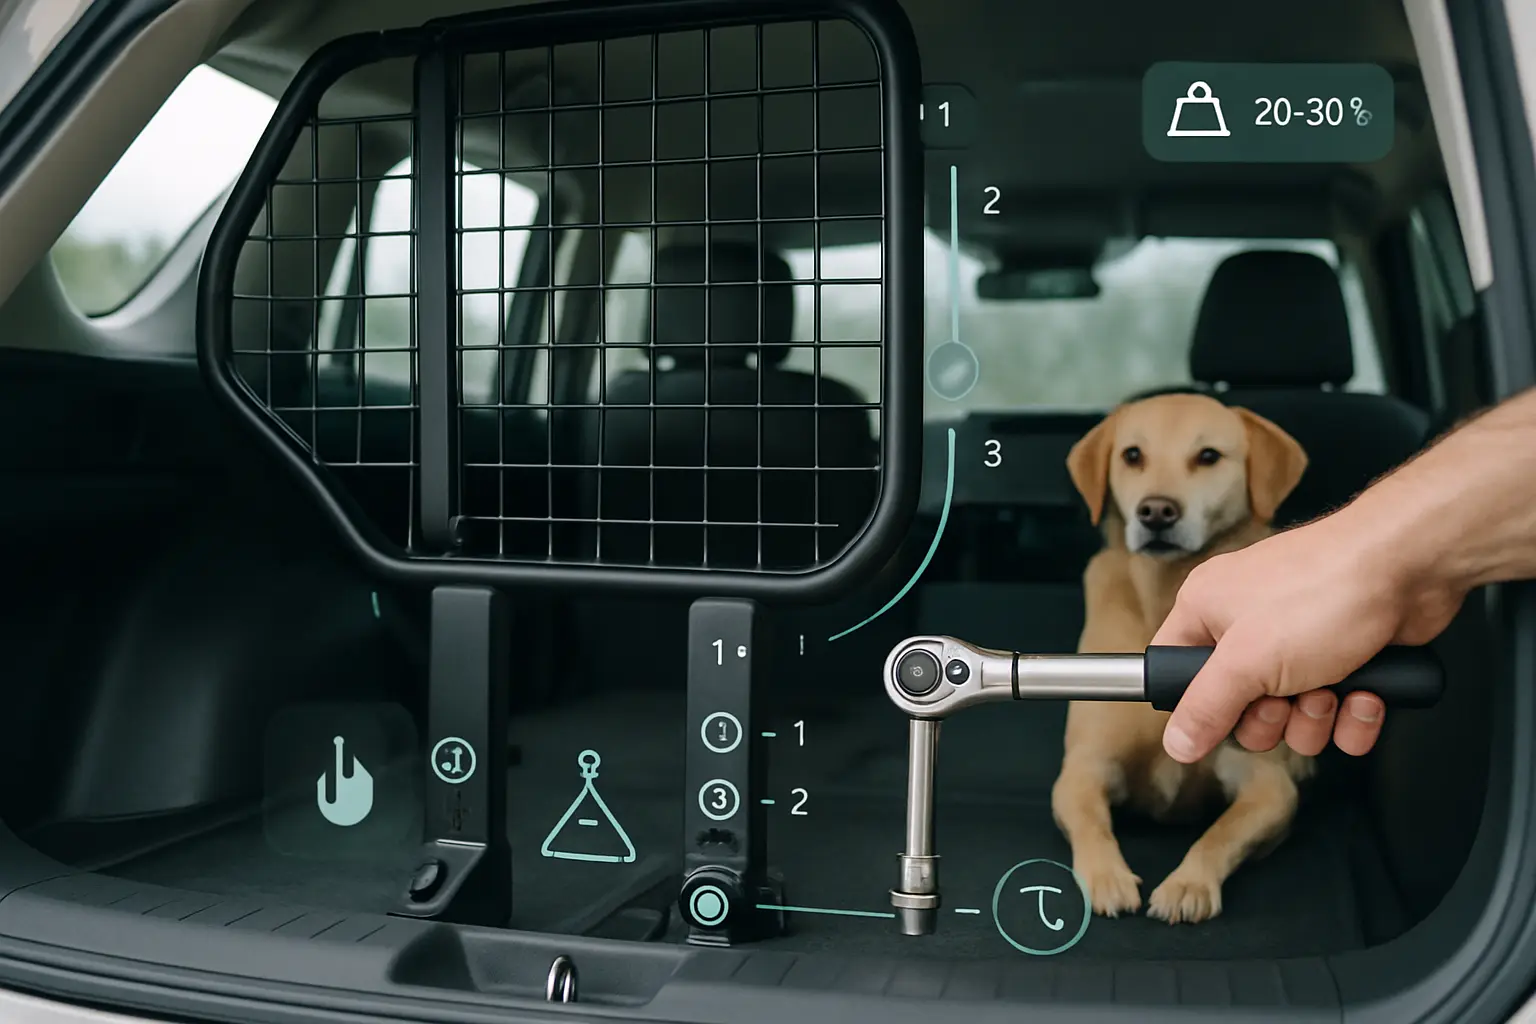
Method 3 — Install a rigid cargo barrier or pet divider
Types of barriers (fixed, telescoping, custom-fit panels)
Rigid cargo barriers come in three common forms. Fixed steel or aluminum frames bolt to mounting points and provide the strongest separation. Telescoping barriers expand between floor and ceiling without drilling. Custom-fit panels match the vehicle’s contours for a tight seal and often mount to existing seat anchors. Materials range from powder-coated steel to lightweight aluminum with a mesh or solid sheet infill. Choose a model rated for vehicle use and labeled for load transfer or crash testing when available.
How to mount and test a barrier for load transfer and stability
Mount the barrier to manufacturer-recommended anchor points. If the vehicle has ISOFIX or rear-seat tether anchors, use them when the barrier’s instructions allow. Tighten fasteners to specified torque values and use lock washers or threadlocker per instructions. After installation, perform staged tests:
- Push on the barrier with steady force to check movement.
- Place a weighted bag (20–30% of dog weight) against the barrier and drive a short distance at moderate speed to feel for looseness.
- Inspect fasteners after the test and re-torque if needed.
Document mounting points and take photos for future checks.
Pros, cons, and when a barrier alone is insufficient
Pros: barriers keep the pet in the cargo area, prevent driver distraction, and allow ventilation. Cons: many barriers do not restrain a dog during a crash, and some transfer load to interior trim rather than the vehicle frame. A barrier alone is insufficient for anxious dogs, dogs that can climb or squeeze through gaps, or in vehicles without solid anchor points. In those cases combine the barrier with a secured crate, crash-tested harness, or tether. For guidance on securing crates that pair well with barriers see 5 ways to secure a dog crate in car.
When buying, prioritize barriers with clear mounting instructions and consider professional installation for heavy-duty systems. For the safest outcome, pair a rigid barrier with a secondary restraint system.
Method 4 — Use vehicle anchor systems and adjustable straps for direct stabilization
Comparing ratchet, cam-buckle, and webbing strap solutions
Choose strap hardware based on load capacity, adjustability, and ease of release. Ratchet straps offer the highest tension and minimal slippage. They suit heavy crates or large dogs but require careful operation to avoid over-tightening. Cam-buckle straps provide quick adjustments and gentler tension, making them good for medium loads and frequent removal. Plain webbing with carabiners works for light stabilization and short trips. Prioritize straps rated for automotive use and labeled working loads. Stainless steel hardware resists corrosion. Where frequent tightening matters, pick a system that allows controlled incremental tension without damaging crate frames.
Proper routing through crate frames or pet anchors for maximum restraint
Route straps to create a low center of gravity and prevent forward and lateral movement. Anchor points should be the vehicle’s OEM tie-downs, seatbelt D-rings, or bolted cargo anchors. Thread straps through the crate’s reinforced frame, not through mesh or door latches. Cross-bracing—one strap front-to-back and one side-to-side—reduces rotation. When using vehicle anchors, attach near the floor and avoid routing over sharp edges. For step-by-step crate attachment techniques, see 5 ways to secure a dog crate in car.
Safety checks: tension, abrasion protection, and periodic re-tightening
Perform a pre-drive inspection every trip. Pull each strap to a firm tension and then test the crate with a solid shove. Leave no more than one to two inches of movement. Add edge protectors or folded webbing where straps contact metal to prevent abrasion. Check for frayed stitching, rusted hardware, or UV-damaged webbing and replace compromised parts immediately. Re-tighten after 10–20 minutes of driving; materials can settle. Keep a compact strap tool and spare carabiner in the cargo area. A final CTA: confirm restraint stability before starting longer trips to protect both the dog and vehicle occupants.
Method 5 — Stabilize using non-slip mats, blocking, and supplemental supports

Anti-slip liners, foam wedges, and sandbag/weight placement techniques
Place a heavy-duty anti-slip liner under the crate or dog bed to cut lateral movement. Choose rubberized liners rated for automotive use; they resist compression and moisture. Add foam wedges between the crate sides and vehicle walls to fill gaps. Use closed-cell foam or pool noodles wrapped in duct tape for a snug fit. For extra hold, place sandbags or purpose-made weight bags against the rear of the crate.
Position weights low and centered to lower the center of gravity. If the cargo area has tie-down anchors, place weight bags on both sides of the crate and secure them with straps. Avoid placing loose objects that can become projectiles.
How to combine low-tech fixes with other restraint methods
Layer stability methods for best results. Start with a non-slip liner, then add wedges, and finally use a crate tie-down or cargo harness. The liner controls sliding, wedges prevent rocking, and straps stop forward motion. For tethered dogs, use a crash-tested harness attached to vehicle anchors and still use the liner and wedges to reduce stress on the harness during sudden stops.
When temporary fixes are acceptable and when to upgrade
Temporary fixes suit short, low-speed trips and calm dogs under 30 pounds. Replace temporary measures for long drives, large dogs, or off-road travel. Upgrade when the dog shows anxiety, repeated shifting, or when local law mandates crash-tested restraints. For more secure crate options and anchoring techniques, see 5 ways to secure a dog crate in car.
Pre-trip safety checklist, in-ride monitoring, and quick FAQs
Final pre-departure tests and a short test drive routine
Before leaving, check every attachment point and fastener on harnesses, tethers, and crate anchors. Verify seatbacks and cargo nets lock solidly. Do a five-minute test drive that includes turns, stops, and a brief highway stretch. Observe the dog’s balance and the gear for shifting. If anything moves, stop and re-secure before longer travel.
Temperature, ventilation, breaks, and signs your dog is stressed
Monitor cargo temperature with a simple thermometer or vehicle climate sensors. Keep vents directed toward the cargo area or crack a window when safe. Plan breaks every 90 minutes for water and a short walk. Watch for pacing, heavy panting, drooling, whining, or listlessness—these indicate overheating or anxiety and require immediate attention. For gear and comfort ideas see Essential Dog Travel Tips and Gear for Road Trips.
Troubleshooting shifting crates, noisy stabilization, and common mistakes
If a crate slides, add non-slip mats and bolt plates to anchor points. Use cam straps rather than elastic cords to cut noise and movement. Replace failing buckles and avoid overpacking the cargo area; loose items become projectiles. Common mistakes include under-tightening straps, placing the crate on folded seats, and ignoring vehicle-specific anchor limits.
Quick answers: legality of cargo travel, leaving dogs unattended, and best crate placement
Many jurisdictions allow dogs in cargo areas if restrained, but local laws vary. Never leave a dog unattended in a closed vehicle, especially in warm weather. Place the crate so the dog faces the rear or driver side depending on airflow and crash-protection design. When unsure, choose a manufacturer-tested crate and follow its placement instructions for best safety.
Summary
Securing a dog in an SUV cargo area protects the dog, driver, and passengers by preventing sudden movement and minimizing crash forces. This guide walked through five safe, practical methods—crash-aware crates with tie-downs, cargo-specific harnesses and tethers, rigid barriers, vehicle anchor systems with adjustable straps, and stability add-ons like non-slip mats and blocking—so owners can match equipment to their vehicle, dog, and trip length.
By measuring the cargo space, selecting crash-tested gear, using factory-rated anchor points, and performing short test drives with regular re-checks, owners can create a stable, comfortable setup. Airflow, temperature, tether length, and proper strap routing complete the safety picture, while legal awareness and in-ride monitoring help avoid common mistakes.
Key Takeaways
- Prioritize a crash-tested crate or harness sized to the dog, and anchor it to factory D-rings, seat-belt mounts, or certified cargo anchors.
- Use rated straps (ratchet or cam-buckle), route through reinforced crate frames, and cross-brace to limit forward and lateral movement.
- Set tether length to about half the dog’s body length so the dog can stand and lie down without being able to surge forward.
- Layer stability: non-slip liner + wedges/blocks + straps; add a rigid barrier as a secondary containment, not the only restraint.
- Perform a pre-trip test, re-tighten after 10–20 minutes, and monitor ventilation, temperature, and stress signals throughout the drive.
FAQ
-
What is the safest way to secure a dog in an SUV cargo area?
A crash-tested crate tied to factory anchor points with rated straps is typically the most secure. A crash-tested harness with a short tether to structural anchors is a strong alternative, especially when paired with a barrier. -
How long should the tether be for a cargo-area harness setup?
Aim for a slack length about half the dog’s body length. The dog should stand and lie down but not reach the hatch or launch forward during braking. -
Why use factory anchors instead of hooks or trim pieces?
Factory anchors and seat-belt mounts are designed to transfer load to the vehicle structure. Hooks, rails, or trim can fail under sudden forces and compromise safety. -
What comfort steps help dogs settle in the cargo area?
Use a non-slip mat, low-profile bedding, and ensure clear ventilation to the cargo space. Plan regular breaks and monitor temperature and stress signs. -
How often should straps and fasteners be checked during travel?
Re-check after the first 10–20 minutes, then at each stop. Replace any frayed webbing or damaged hardware immediately.