7 Effective Ways to Secure a Dog in a Car With a Leash
Last Updated on September 11, 2025
Drivers often need a quick, safe way to secure a dog in a car with a leash. The goal is short, supervised trips without chaos. When paired with a crash-tested harness and solid vehicle anchor, a leash-based restraint can prevent lunging, roaming, and parking-lot escapes. This guide walks through 7 effective ways that reduce forward motion, minimize distraction, and protect the dog’s neck.
It also clarifies when a leash won’t suffice and a crate, barrier, or crash-tested harness belongs in the plan. The guide provides practical steps for choosing rated tethers, setting leash length, and using seat-belt, LATCH/ISOFIX, or cargo anchors. It includes fit checks, training tips, legal notes, and a pre-ride safety checklist. The payoff is safer stops, calmer rides, and fewer costly mistakes.
When to secure your dog with a leash in the vehicle
A leash-based restraint proves useful when the trip calls for short stops, controlled exits, or quick transfers between vehicle and destination. Drivers should use a leash when they must remove the dog from the car frequently, such as for vet visits, restroom breaks, or short errands where the dog rides in the passenger area. A leash helps prevent sudden escapes at rest stops and keeps the dog from moving into the driver’s space and causing distraction.
Do not rely on a simple handheld leash for long highway trips or for dogs that jump, pull, or chew through restraint points. Instead, use a properly anchored leash only for brief, supervised situations. Always attach the leash to a harness rather than a collar to reduce neck injury risk during sudden braking.
For dogs transported in a vehicle’s cargo area, owners should consider specific methods for securing that space to prevent shifting and injury. See guidance on securing the cargo area of an SUV for best practices and anchor options: how to secure a dog in the cargo area of SUV.
Situations where a leash-based restraint is appropriate
Use a leash-based restraint when the driver expects frequent, short exits and can supervise the dog. Good examples include:
- Quick stops at a vet, groomer, or pet-friendly store where the dog must exit and re-enter the vehicle.
- Short neighborhood drives where the dog will be stepped out for a potty break.
- Loading and unloading when the dog needs guidance entering or exiting a high vehicle.
- When the dog will be briefly tethered to a secure anchor while the owner stays with the car.
When using a leash inside the vehicle, always fasten it to a harness and use a quick-release clip for emergency removal. Never tie a leash to a door handle, seat track, or window—these points can fail in a crash. For puppies and small dogs transported without a crate, review safe non-crate options and leash techniques at how to transport a puppy in a car without a crate.
Dog size, temperament, and health factors to consider
Match leash-based restraint decisions to the dog’s size, behavior, and medical needs. Small, calm dogs tolerate short leash tethering better than large, excitable breeds. For large dogs, a leash attached inside the car can allow dangerous forward motion during hard braking. Assess these factors:
- Weight and strength: Strong pullers can generate forces that injure both the dog and vehicle occupants.
- Temperament: Anxious or reactive dogs may lunge, making a simple leash unsafe.
- Health and age: Seniors, pregnant dogs, or those with orthopedic issues need softer restraint and more support when moving.
For heavy or immobile dogs, plan loading assistance and safer restraint types. Guidance on lifting and handling large dogs helps determine whether a leash is appropriate: 5 steps to safely lift a large dog into a car.
When to choose a crate, barrier, or professional restraint instead
Opt for a crate, barrier, or crash-tested harness when the dog poses a higher risk in transit. These situations include long highway travel, transporting strong or restless dogs, and trips where the dog must be left unattended for short periods. Crates confine motion and reduce injury risk during collisions. Barriers block access to the driver and stabilize the dog’s position in the rear area.
Professional restraints and crash-tested harnesses distribute forces and minimize neck trauma. Choose a restraint rated for the dog’s weight and secured to the vehicle’s anchor points. For crate buyers, consult reviews and specifications to pick crash-rated models that fit the vehicle and dog size. See a detailed roundup of travel crates to compare safety and fit: best dog crates for car travel in 2023.
CTA: when in doubt, switch to a certified crate or harness for longer journeys and consult a vet or professional restraint installer for tailored advice.
Seven safe leash-based restraint methods for car travel
Owners should plan restraint choices to reduce movement and injury risk during trips. This section lists seven leash-compatible methods that match different vehicle layouts and dog temperaments. Each method prioritizes crash-tested gear, correct fit, and minimal slack. For busy drivers, combine a short, strong tether with a harness to limit forward momentum and prevent distractions. Routine checks before departure ensure buckles, anchors, and stitching show no wear. For further gear guidance and packing lists, consult this essential dog travel tips and gear. Owners should test equipment on short drives first and replace anything with visible damage.
Crash-tested car harness clipped into the seat belt (belt-loop harness)
A belt-loop harness designed for automotive use attaches directly to the vehicle seat belt. Select harnesses that list crash testing and size the chest strap to the dog’s girth. Fit must prevent the dog from backing out and distribute force across the chest and shoulders. Install the seat belt through the harness’s belt loop or clip per manufacturer instructions, then remove slack so the dog can sit or lie but not lunge forward. After fitting, perform a gentle tug test to confirm security. For fitting tips and harness options, see how to transport a puppy in a car without a crate.
Buckle-in tether attached to a travel harness (seat-belt buckle tether)
A buckle-in tether plugs into the vehicle’s seat-belt receiver and attaches to a travel harness. This setup uses the car’s locking retractor to limit movement. Choose tethers that meet automotive strength standards and use wide, padded harnesses to avoid neck strain. Adjust tether length so the dog can change position but cannot reach the front seats. Always fasten the dog before the trip and unclip after stopping. Incorporate lifting or positioning techniques for larger dogs to reduce strain when placing or removing them; practical steps appear in 5 steps to safely lift a large dog into a car.
Using vehicle LATCH/ISOFIX anchor points with a purpose-built tether
Some tethers attach to LATCH/ISOFIX anchors originally meant for child seats. Use only purpose-built pet tethers rated for these anchors to avoid compromising child-safety anchors. Secure the tether to the anchor and to the dog’s travel harness according to manufacturer torque and load guidelines. Verify anchor compatibility with vehicle manuals before installing. This method keeps dogs in the rear seating area and reduces forward movement without relying on seat-belt geometry. Guidance on securing in-vehicle gear and anchor options can be found in 5 ways to secure a dog crate in car, which also discusses anchor usage.
Adjustable cargo or seat-frame tether for trucks and SUVs
For dogs riding in open cargo areas, an adjustable tether that attaches to a cargo eye, seat frame, or reinforced D-ring works well. Use wide, abrasion-resistant webbing and a low-stretch shock-absorbing design. Anchor points must be vehicle-rated and placed to prevent the dog from falling out of the cargo area or moving into passenger zones. Keep tether length minimal to prevent entanglement with cargo and use quick-release hardware for emergencies. For advice specific to SUV cargo setups and securing dogs in the rear, review how to secure a dog in the cargo area of SUV.
Secure, crash-tested crate anchored in the vehicle (use leash only for loading/unloading)
A crash-tested crate offers maximum containment and energy management during collisions. Anchor the crate to seat anchors or the cargo floor using straps or vehicle-rated tie-downs. When using a crate, keep the leash off the dog during transit; use the leash only to move the dog into or out of the crate to avoid entanglement risks. Choose a sturdy crate sized for the dog to stand, turn, and lie down. For crate selection and anchoring techniques, consult the best dog crates for car travel review.
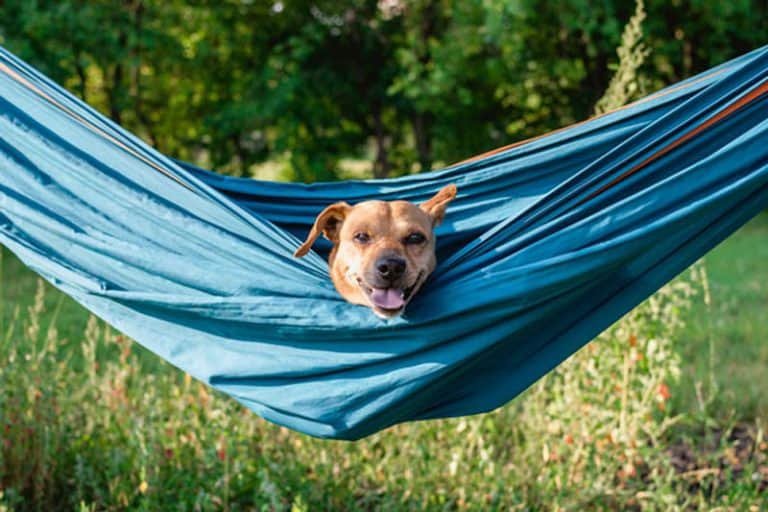
Back-seat hammock combined with a harness tether for contained rides
A back-seat hammock protects upholstery and creates a contained area when paired with a short harness tether. Anchor the hammock to headrests and seat-back anchors so it stays taut. Clip a crash-tested tether from the harness to a seat anchor; keep it short enough to prevent the dog from climbing into the front. This setup reduces movement and keeps the dog off the floor. Owners should choose hammocks with reinforced seams and waterproof layers. Practical hammock usage ideas and camping crossover tips appear in 9 tips for hammock camping with your dog.
Short tether to a reinforced headrest or dedicated seat anchor (safe technique and limits)
A short tether to a reinforced headrest or manufacturer-rated seat anchor works for calm, small dogs during brief trips. Confirm the headrest assembly and anchor points withstand sudden loads and never attach a collar-only leash to these anchors. Always use a properly fitted harness and set tether length to prevent the dog reaching the driver. Avoid this method for high-speed travel or large, excited dogs. For rules and safety considerations about where dogs may ride, see are dogs allowed to travel in the footwell of a car.
Choosing the right equipment for leash-based car safety

Choosing the right equipment starts with a clear priority: limit forward and lateral movement while avoiding neck pressure. Pick a purpose-built, crash-tested tether or seat-belt adapter rather than improvising with a regular leash. Look for solid metal hardware, heavy-duty webbing, and reinforced stitching. Avoid retractable leashes and thin fashion leads. They can snap or jam under sudden force.
A complete setup includes a properly fitted harness, a short tether or vehicle-specific leash, and a reliable anchor point. Match the harness size to the dog’s measurements and verify adjustability across the chest and girth. Use tethers that attach to the vehicle’s lower anchors, a dedicated bolt-in anchor, or the seat belt buckle—whichever yields a secure, low-mounted point.
Owners should inspect gear before every trip for fraying, corrosion, and loose stitching. Replace any component with visible wear. For product choices and packing tips, consult detailed gear guides like essential dog travel tips and gear for road trips. Compare crash-test ratings and manufacturer instructions before installing any tether. A correct fit and certified components reduce injury risk and keep the dog restrained without discomfort.
Crash-test ratings, materials, and durability to look for
Certain standards indicate safer gear. Look for products tested by reputable organizations and labeled with crash-test results. Tests typically measure how well a harness or tether holds a dog during a 30–50 mph frontal impact. Pay attention to the dog weight class used in tests and whether the model passed for that weight.
Material choices matter. Choose marine-grade stainless steel or aerospace-grade alloy for buckles and carabiners. Use 1,000+ denier nylon or ballistic webbing for tethers. Check for box-and-bar tack stitching or multi-row zigzag seams at load points. Avoid plastic snap clips on any tether intended for car restraint.
Durability includes UV and salt resistance for road use, abrasion resistance where straps contact hardware, and a clear maintenance plan. Manufacturers should publish maximum load ratings. Owners should factor in dynamic loads during sudden stops; those exceed static body weight. For context on travel-grade gear and secure transport options, see reviews like best dog crates for car travel. Prioritize tested, rated components over cheaper, uncertified alternatives.
Why a harness (not a collar) is required for tethering in a car
Tethering to a collar concentrates crash forces on the neck. That can cause spinal injuries, tracheal damage, or strangulation. A harness disperses forces across the chest and shoulders. It reduces the risk of serious neck trauma during abrupt stops or collisions.
Choose a harness designed for restraint rather than simple walking. Crash-tested harnesses distribute energy through reinforced chest plates and broad straps. They feature secure attachment points designed to remain fixed under load. The fit must be snug but not restrictive. Dorsal (back) attachment points keep the dog facing forward and reduce rotational forces.
For puppies or dogs traveling without crates, a harness is indispensable. Properly introduce the harness with short rides and rewards so the dog tolerates it during travel. For more tips on transporting a dog safely without a crate, review practical guidance such as how to transport a puppy in a car without a crate. Never attach a leash directly to a collar for car restraint.
Selecting the right leash length, hardware, and connectors
Leash length in the car should minimize slack while allowing a natural seated posture. Short, fixed-length tethers around 6–12 inches prevent the dog from lunging into the front or being thrown around the cabin. Avoid long leads that allow the dog to stand or move freely.
Choose hardware rated for dynamic loads. Look for locking carabiners or snap hooks rated in kilonewtons (kN). Swivels reduce strap twist and prevent accidental unhooking. Use metal buckles or welded rings rather than molded plastic. Ensure connectors mate securely with vehicle anchors—seat belt buckles, lower LATCH anchors, or dedicated bolt-in points.
Installation matters. Anchor the tether low and centered to limit vertical and rotational movement. Use tether assemblies with clear instructions and quick-release options for emergency removal. Inspect connectors for corrosion and test them by applying firm hand force before each trip. For guidance on vehicle anchor methods and securing dogs in larger cargo areas, consult related how-to resources such as how to secure a dog in the cargo area of an SUV.
How to fit and install common leash-based systems (step-by-step)
The aim is a secure, crash-aware connection between dog and vehicle. Start by choosing the right system: a travel harness plus a tether, a seatbelt clip, or a crate/hammock anchored to the car. Measure the dog’s girth and chest to confirm harness size. Check vehicle anchor locations, including seatbelt buckles, LATCH points, cargo tie-downs, and seat-frame anchors.
Step-by-step install workflow:
- Fit the harness to the dog per the manufacturer’s instructions.
- Pick the tether style that matches the car’s anchor points.
- Attach tether to the harness D‑ring—not the collar.
- Secure the tether to the chosen anchor (seatbelt buckle, LATCH, cargo hook).
- Remove excess slack while leaving enough room for the dog to sit or lie down comfortably.
- Perform a pull test and a short drive at low speed to confirm restraint behavior.
Perform these checks before every trip: buckles locked, straps untwisted, and no frayed webbing. For broader gear recommendations and road-trip packing tips, see essential dog travel tips and gear for road trips. Use crash-tested components whenever possible.
Properly fitting a travel harness and checking fit before every trip
A travel harness must distribute force across the chest and shoulders. Measure the dog’s girth behind the front legs and compare that to the size chart. Choose a harness labeled for vehicle restraint or crash-testing when available. Place the harness so the chest strap sits high on the sternum and the shoulder straps lie flat.
Fit checklist before every trip:
- Adjust straps until the harness is snug but not tight—one to two fingers should fit between strap and dog.
- Make sure no straps cut into the armpits or restrict shoulder movement.
- Confirm the tether attachment point aligns with the dog’s center of mass to reduce torque in a stop.
- Inspect buckles, webbing, and stitching for wear and damage.
- Allow the dog to sit, stand, and lie down while wearing the harness.
For puppies, choose an adjustable harness and repeat fittings often. For more transport alternatives and harness tips for young dogs, consult how to transport a puppy in a car without a crate.
Installing a seatbelt clip or buckle tether correctly
A seatbelt clip or buckle tether converts the vehicle’s belt system into an anchor. Use hardware rated for pet restraint and follow harness and vehicle instructions. Never attach a dog only by the collar when using a seatbelt clip.
Installation steps:
- Thread the seatbelt through the tether or clip as the manufacturer directs.
- Fasten the seatbelt into the buckle or clip according to the vehicle manual.
- Attach the tether’s snap to the harness D‑ring, not the collar.
- Tighten the belt so the tether has minimal slack yet allows the dog to lie down.
- Test by applying firm forward force; the anchor should hold without belt slippage.
Position the dog on a rear seat when possible. Avoid letting the dog ride in the footwell; review safe placement and local rules at are dogs allowed to travel in the footwell of a car. Replace any belt hardware showing deformation.
Attaching a tether to LATCH, cargo hooks, or seat-frame anchors safely
Using factory anchors can produce a cleaner, stronger restraint. Locate anchors in the vehicle owner’s manual. Use hardware designed for pet tethers or universal tether straps with rated carabiners. Avoid using headrest posts unless specifically rated for restraint.
Safe attachment steps:
- Confirm the anchor’s load rating in the vehicle manual.
- Run the tether to the anchor with no sharp bends or twists.
- Attach using a welded carabiner or rated snap, and ensure it seats fully.
- Set tether length to limit dangerous forward travel while preserving comfort.
- Perform a static pull test and then a short low-speed drive test.
For tethering a dog in an SUV cargo area, follow vehicle-specific guidance and tested anchoring techniques found at how to secure a dog in the cargo area of an SUV. Replace any tether showing cuts or UV degradation.
Anchoring a crate or hammock so the leash solution performs as intended
Crates and hammocks create a controlled space that works with leash-based restraints. Center the crate on a flat surface and use multiple anchor points. For hammocks, attach corners to separate anchors to prevent sagging.
Anchoring steps for crates and hammocks:
- Choose a crate size that allows the dog to stand and turn.
- Use straps to secure the crate to seat anchors or cargo tie-downs.
- Where possible, attach two opposing anchor points to prevent rotation.
- Fasten a leash or tether to the crate’s reinforced anchor, not a mesh door.
- For hammocks, check that seams and attachment straps are rated for pet load.
Before every trip, apply force to the setup to confirm it resists sliding or tipping. For proven methods to secure crates in cars, see 5 ways to secure a dog crate in car. Ensure quick-release access for emergencies.
Preparing and training your dog for leash restraint in the car

Proper preparation focuses on safe gear selection and basic obedience before attempting leash restraint in a moving vehicle. Choose a crash-tested, padded harness designed for car use. Avoid attaching a leash to a flat collar; a harness distributes force across the chest and shoulders. Use a short, strong tether or a seatbelt-style leash that anchors to the car’s lower tether or seatbelt buckle. Measure fit so the harness sits snugly but allows two fingers of clearance.
Train core behaviors at home first. Teach sit, stay, place, and calm mounting cues using short, frequent sessions. Practice leash manners and gentle restraint on the harness while stationary. Pair harnessing with high-value treats and brief play to create positive associations.
Plan a stepwise training schedule: gear selection, harness habituation, stationary restraint practice, then brief supervised travel. Keep all sessions under five minutes at first and increase duration gradually. Owners should document progress and adjust gear or techniques when the dog shows stress. For practical travel gear and broader preparation, consult essential dog travel tips and gear for road trips.
Gradual acclimation and short practice rides
Gradual acclimation minimizes fear and teaches the dog to accept leash restraint in the car. Begin with the engine off. Put the harness on, attach the tether, and reward calm behavior. Next, sit in the parked car with the dog secured for one to three minutes while offering treats. Turn the engine on for another short session to add the vibration cue.
Move to very short drives of one to three minutes around the block. Increase ride time by two to five minutes per successful, calm trip. Use a consistent routine: harness, seat position, tether attachment point, and a quiet voice. Stop and praise immediately for calm behavior at the end of each ride.
Watch body language closely: panting, drooling, pacing, or whining indicate stress. Pause progression if these signs persist. Never anchor the tether to a headrest alone; use a proper lower anchor or seatbelt attachment. For puppy-specific transport techniques and stepwise at-home practices, reference how to transport a puppy in a car without a crate.
Positive reinforcement, calming techniques, and dealing with motion sickness
Positive reinforcement accelerates learning and reduces travel anxiety. Reward calm postures with small, frequent treats and brief praise. Use clicker training or a marker word to pin desirable behavior. Pair restraint with chews or frozen treat puzzles that keep the mouth busy and reduce nervous energy.
Implement calming aids as needed: a snug anxiety vest, canine pheromone sprays, and familiar bedding. Keep the cabin cool and well-ventilated. Avoid feeding within two hours of departure to lower motion-sickness risk. For dogs prone to nausea, offer a bland snack an hour before travel only if tolerated.
When motion sickness occurs, consult a veterinarian about antiemetic options or short-term medications. Natural aids like ginger can help some dogs, but owners should confirm doses with a vet. For step-by-step strategies to make car rides more comfortable for nauseous dogs, see no more doggie dramas: making car rides enjoyable for motion-sick pups.
What to practice at home before a long drive
Home practice builds reliable behaviors that translate to long drives. Rehearse loading and unloading calmly, using the same verbal cues and rewards planned for travel. Train the dog to hold a place on a mat or booster seat while restrained. Practice fastening and unfastening the tether quickly so handlers can act smoothly during stops.
Run mock trips in the driveway. Start the engine, secure the dog, and walk around the car while it idles. Practice emergency exits: unclip the tether and get the dog out calmly and safely. Reinforce a quiet recall from the car and calm settling after exiting.
Large-dog handlers should rehearse safe lifting and loading techniques to reduce strain and prevent injury. Review proper lifting steps and body mechanics before the trip. For guidance on moving large dogs into vehicles safely, consult 5 steps to safely lift a large dog into a car. Consistent practice at home creates a predictable routine that lowers stress on long drives.
Safety rules, common mistakes, and legal considerations
Caregivers must treat vehicle restraint as a safety protocol, not an afterthought. A proper system keeps the dog secure, reduces driver distraction, and lowers injury risk in crashes. Key rules include using a restraint sized and rated for the dog, anchoring it to the vehicle’s structure, and combining restraint with a stable location like the back seat or cargo area. Regularly inspect harnesses, leash clips, and anchors for wear.
Common mistakes include relying on human-holds, using weak hardware, and letting the dog roam the cabin. The title’s focus, 7 Effective Ways to Secure a Dog in a Car With a Leash, emphasizes leash-based solutions that still meet these safety standards. When possible, choose solutions designed for automotive use rather than repurposing walking gear.
For advice on anchoring and configuring a secure area that pairs with leash-based restraints, see guidance on how to secure a dog in the cargo area of an SUV: how to secure a dog in the cargo area of an SUV. Caregivers should pair those methods with crash-rated harnesses and follow local laws discussed below. A quick CTA: confirm gear ratings before the next trip.
Unsafe tethering practices to avoid (collars, door handles, unsecured objects)
Tethering a dog by a collar creates a severe neck-injury risk. A collar can catch on seat frames, causing strangulation in sudden stops. Door handles and interior trim are not engineered as anchors and can fail or detach. Unsecured objects—bags, loose leashes, or weak clips—become projectiles and may amputate or crush limbs during impact.
A safer approach pairs a purpose-built, crash-rated harness with a vehicle anchor point or rigid tether. Avoid tethering to anything that can deform or detach. Use hardware rated for automotive loads and inspect connection points before every trip.
Practical checks before departure:
- Confirm harness fits snugly across chest and shoulders, not the neck.
- Attach to a vehicle anchor designed for pet restraints or to the seat’s lower anchor if approved.
- Replace frayed leashes, rusted clips, and cracked plastic components immediately.
For alternative containment methods that avoid unsafe tethers, review the article on secure crate installation: 5 ways to secure a dog crate in car.
Post-crash precautions and why crash-tested gear matters
After any collision, even a low-speed one, treat the restraint system as compromised. Webbing can stretch, stitching can fail, and metal parts can deform. Manufacturers and safety organizations recommend replacing harnesses and tethers following an impact. Continuing to use post-crash gear risks catastrophic failure on the next trip.
Crash-tested gear undergoes controlled-impact testing to verify load limits and failure modes. Look for harnesses and crates tested to standards like ASTM or those independently crash-verified. Test data should include force thresholds and failure descriptions. Prioritize gear that secures to vehicle anchorage points rather than relying solely on seat belts or improvised loops.
Owners should also document gear and incident details for insurance or veterinary claims. Photograph damaged equipment, record vehicle damage, and get veterinary checks even if injuries appear minor. Replacing compromised equipment prevents latent failures and aligns with safe-practice guidance found in reviews of car-ready crates: best dog crates for car travel in 2023.
Relevant laws, airline and truck bed rules, and liability notes
Laws vary by state and country. Many jurisdictions prohibit driving with an unrestrained animal if it interferes with safe vehicle operation. Some states have explicit statutes about pets as unsecured loads. Civil liability can follow if an unrestrained dog causes an accident or injury during a trip.
Airlines maintain separate policies for cabin and cargo transport. Size, breed, and crate specifications differ between carriers. Always confirm airline requirements well before travel, and use approved carriers and restraints for airport and in-flight transport. For specifics on cargo policies and carrier lists, consult guidance on airlines that transport dogs: airlines that allow dogs in the cargo.
Regarding truck beds, many jurisdictions and safety groups discourage transporting dogs in open beds. Even when allowed, truck beds expose animals to ejection and environmental hazards. Liability frequently falls on the owner if the dog causes harm or suffers injury. When doubt exists, choose enclosed, anchored containment and documented, approved restraints to limit legal exposure.
Pre-ride checklist and quick troubleshooting

Before every trip, run a focused safety sweep that confirms the leash-based restraint fits, anchors securely, and won’t allow the dog to reach the driver. Keep the checklist short and actionable so it becomes routine. When something fails, the priority is stopping safely, checking attachments, and using a temporary alternative to prevent movement until proper restraints return.
Short safety checklist to run before every trip
- Verify harness fit: two fingers under the chest strap; no choke collars for restraint.
- Attach the leash to a dedicated seatbelt anchor or crash-tested tether, not a loose headrest loop alone.
- Ensure the leash length limits forward movement but allows a natural sitting position.
- Secure crates and boosters with seatbelts or anchors; place non-slip mats under carriers.
- Lock windows partially and set vents for steady airflow; pack water and a bowl.
- Confirm doors and trunk are fully closed and child locks engaged if applicable.
Signs your dog is uncomfortable or the system is failing
Watch for persistent panting, continuous whining, frantic pawing at the leash, repeated attempts to bolt, or rubbing that causes raw spots. Sudden slack or constant tension on the leash indicates a poor anchor or a swallowed belt. Any change in breathing, gagging, or pale gums requires immediate stop and assessment. Use short, calm checks every 10–15 minutes on long trips.
Quick fixes and alternatives if a leash-based method isn’t suitable
If a leash setup fails, switch to a secured crate or a vehicle barrier until a proper harness or tether is available. A non-slip hammock or seat cover plus a short seatbelt-attached harness can reduce sliding for short runs. For longer travel, move to a crash-tested harness or a well-anchored crate. For gear and packing tips that complement these fixes, see essential dog travel tips and gear for road trips.
CTA: If unsure which alternative to choose, shop for a crash-tested harness or crate rated for vehicle use before the next trip.
Summary
This guide explains when a leash-based restraint makes sense and how to use it safely, focusing on seven practical methods that pair a short tether with a properly fitted travel harness. It walks through anchor choices (seat belt, LATCH/ISOFIX, cargo tie-downs), correct installation, and training so the dog stays secure without neck pressure or dangerous slack.
Readers learn how to match methods to dog size and temperament, when to step up to a crate or crash-tested harness for longer trips, and how to avoid common errors like clipping to a collar or using flimsy hardware. The checklists, post-crash advice, and legal notes round out a safety-first approach that keeps both occupants and dogs protected.
Key Takeaways
- Always use a car-rated harness, never a collar; keep the tether short (about 6–12 inches) and anchor it to the seat belt, LATCH/ISOFIX, or cargo D-rings—avoid door handles or trim.
- Choose among seven leash-compatible setups based on vehicle layout and behavior; for strong, restless dogs or highway travel, switch to a crash-tested harness or an anchored crate.
- Fit the harness snugly (two-finger rule), remove excess slack, seat the dog in the rear, and do a pull test plus a short drive to confirm the setup.
- Train with gradual acclimation and positive reinforcement; manage motion sickness with cool airflow, light scheduling of meals, and veterinary guidance when needed.
- Inspect webbing, buckles, and anchors before every trip and replace all restraint gear after any collision or visible wear.
- Know local restraint laws and potential liability; documented, tested equipment and proper anchoring reduce risk.
FAQ
- What is the safest leash-based way to secure a dog in a car?
Use a crash-tested travel harness attached to a seat-belt buckle tether or LATCH/ISOFIX anchor with minimal slack, and seat the dog in the back. This limits forward motion and avoids neck pressure. - Why shouldn’t a leash be clipped to a collar in the car?
Collars concentrate force on the neck, risking tracheal and spinal injury in sudden stops. A travel harness spreads forces across the chest and shoulders. - How short should the tether be?
A fixed length of about 6–12 inches usually allows sitting or lying but prevents lunging or reaching the driver. Anchor low and centered to reduce rotation and vertical lift. - How can a dog be secured in an SUV cargo area with a leash?
Attach a rated, short tether from cargo tie-downs or reinforced D-rings to the harness, keeping slack to a minimum; for best protection, use a crash-tested crate anchored to those points. - How can owners help anxious or motion-sick dogs travel better?
Use stepwise acclimation with rewards, maintain cool ventilation, and avoid feeding for two hours before travel. Ask a veterinarian about anti-nausea or calming options if needed.